Can’t find the PostgreSQL client library (libpq)

You might encounter this error while trying to install the pg gem (v0.10.1), or when updating from v0.10.

My stacktrace on Mac OS X Snow Leopard 10.6.6 with Rubygems 1.4.2, Ruby 1.8.7 and Postgres 9.0.2 was the following:

Building native extensions.  This could take a while...
ERROR:  Error installing pg:
	ERROR: Failed to build gem native extension.

/System/Library/Frameworks/Ruby.framework/Versions/1.8/usr/bin/ruby extconf.rb
checking for pg_config... yes
Using config values from /usr/local/bin/pg_config
checking for libpq-fe.h... yes
checking for libpq/libpq-fs.h... yes
checking for PQconnectdb() in -lpq... no
checking for PQconnectdb() in -llibpq... no
checking for PQconnectdb() in -lms/libpq... no
Can't find the PostgreSQL client library (libpq)
*** extconf.rb failed ***
Could not create Makefile due to some reason, probably lack of
necessary libraries and/or headers.  Check the mkmf.log file for more
details.  You may need configuration options.

Oookay, so let’s try to find out what’s going wrong. A quick Google search shows that errors like this one happens on Linux too, and usually suggests that ARCHFLAGS definitions may be a problem. Indeed, /Library/Ruby/Gems/1.8/gems/pg-0.10.1/ext/mkmf.log contains this error message:

ld: warning: in /usr/local/Cellar/postgresql/9.0.2/lib/libpq.dylib, file was built for unsupported file format which is not the architecture being linked (i386)

The problem seems to come from the way Homebrew installs Postgres.

Homebrew install notes include the following informative message:

If you want to install the postgres gem, including ARCHFLAGS is recommended:
    env ARCHFLAGS="-arch x86_64" gem install pg

There! Now the only problem is if you install your gems as root, you can’t merely put a sudo before the “gem”, but you have to sudo su then execute the command:

Air:~ florent$ sudo su
Password:
sh-3.2# env ARCHFLAGS="-arch x86_64" gem install pg
Building native extensions.  This could take a while...
Successfully installed pg-0.10.1
1 gem installed
Installing ri documentation for pg-0.10.1...
Installing RDoc documentation for pg-0.10.1...

Voilà!

Edit 18 Dec. Chad provided a simpler solution in the comments that doesn’t require you to log in as root and works just as well:

sudo env ARCHFLAGS="-arch x86_64" gem install pg
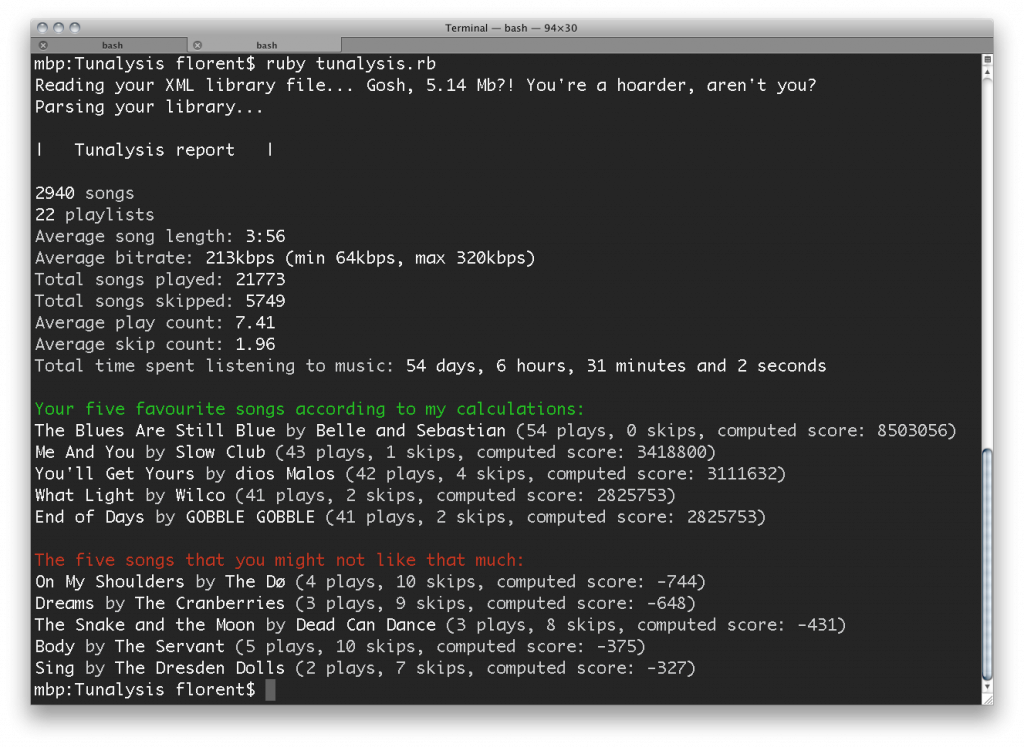
Tunalysis – with screenshot

For all of you number junkies out there:

tunalysis screenshot

Tunalysis development is doing good, as sporadic as it may be. The next step is to rework/refine the algorithm giving rankings, in order to achieve better results. I’ll try to include the “Last Played Date” in the mix, and maybe also use the Date Added.

More good news: no need to install gems by yourself anymore, everything’s included by Bundler.

Tunalysis’s on GitHub!

Set up a mail server on Amazon EC2

This post will explain how to set up a Postfix mail server on an EC2 instance.

First, a word of warning: Amazon IPs generally aren’t highly considered, spam-wise. Meaning that even if you take all the precautionary steps, your emails might end up in spam folders. If email is business-critical for you, you might want to consider other options: host your mail server somewhere else? Use something like SendGrid?

This said, let’s dive in!

Prerequisites

I assume you have the following:

  • A domain name, with control over the DNS records
  • An EC2 account

Pick an AMI

Let’s start by creating an EC2 instance. I began with the vanilla AWS Linux micro instance, which seem to be somehow Fedora-based, and it was a pain. Now do yourself a favor and pick a Debian-based OS. It will make things much more easier.

Eric Hammond and Canonical themselves provides Debian and Ubuntu AMIs, which are a great first step. You can even bypass the whole Postfix config by using one of these AMIs.

Assign an elastic IP to the instance you launched. We will need it for the DNS setup.

Configure Postfix

Now’s the time to be very lazy and just redirect you to Ivar Abrahamsen‘s excellent howto on setting up Postfix. Actually, most of what I’m writing right now can be found on his howto, but let’s not stop at technicalities.

Configure your DNS

The most important step in having your email properly delivered is in your DNS configuration.

The first step is to define an A record for your Amazon Elastic IP, for example mail.mydomain.com. This will be used to set up a reverse DNS on your web server, so that other SMTP servers know that you’re not a spam relay.

Then add an MX record to the address you just defined, for example mail.mydomain.com. Now each SMTP server sending mail to mydomain.com will contact mail.domain.com, which in turn points to your EC2 instance. Awesome!

The next step is to modify your SPF record. I’ll let you work out the details with the spec and Ivar’s howto, and as an example here is the SPF record for remaildr:

remaildr.com.        1800    IN    TXT    "v=spf1 mx ip4:50.16.218.96 include:mx.ovh.com ~all"

This SPF allows MX servers and the IP address 50.16.218.96 (i.e. the EC2 instance) to send mail for remaildr.com. Only “MX” should be enough, no need for the IP in particular ? Well, I thought so, but it didn’t work so I added the IP address. Now it works. If anyone has an idea why, I’m all ears.

The include:mx.ovh.com is automatically added by OVH themselves and is not a problem in our case.

You can use the dig command to check if your DNS settings are properly set. For example, the SPF field was retrieved with a:

$ dig remaildr.com in txt

As a bonus, you might be interested in setting up DKIM (cryptographic email signing), a half of which takes place in your DNS. I’ll once again refer you to Ivan’s howto because it’s that good.

Tell Amazon you’ll be sending emails

By default, Amazon limits the amount of email you can send from an instance. You can ask them to remove that limitation very easily though, through that page.

This form also allows you to set up the reverse DNS I was telling you about. Go on, do it! Amazon usually answers to this form within 1-2 days.

Done!

That’s it!

Do you end up in spam folders? Try the test at AllAboutSpam, and check if everything’s alright. It covers about any issue your server might have.

Remaildr – the tech bits

Here are a few small things you might want to know about http://remaildr.com. Or maybe not, but then again, nobody forces you to read, stranger!

“Hardware”

Remaildr is hosted on an Amazon EC2 micro instance, benefiting of the free tier offer. Apart from the static IP that will probably end up costing me something, remaildr should be about free.

— Edit: as of may, remaildr is now hosted on a VPS at OVH. The EBS volume of my EC2 instance blew up on me, and with the free tier coming to end, EC2 would be too costly.

Network

The remaildr.com domain is registered at OVH, because of the low price and the flexibility they allow on DNS. I added an A record for mail.remaildr.com pointing to 50.16.218.96 —the AWS elastic IP—, then modified the MX record for remaildr.com to point to mail.remaildr.com. That way, every email sent to any_address@remaildr.com will be sent to the right mail server. Having an A record also allows reverse DNS on the mail server, often used to flag spam.

Other DNS modifications included the SPF record, which allows the mail server to actually send emails in behalf of remaildr.com, and a TXT record for DKIM — cryptographically signing outgoing emails.

OVH provides a free 1MB web storage for each domain name subscription, which is more than enough to host the remaildr.com website, weighing about 30KB.

The mail server

The email server at OVH is a run-of-the-mill Debian Squeeze. It runs a Postfix server, configured to forward a few specific email addresses (for example abuse, postmaster and info) to my account, and let everything else go to a catch-all account called remind.

A set of two Daemonized Ruby scripts will then do all the work:

  • receivr.rb will fetch the emails in POP, compute the send date, then put the remaildr to send back into a PostgreSQL database as a Base64-encoded marshalled ruby object (akin to how DelayedJobs works as far as I understand)
  • sendr.rb will read the database and send all the emails who need to be sent

Of course, the code is on GitHub.

That’s about it! Feel free to ask any questions, and I’ll answer as well as I can. :)

Tunalysis – analyse your iTunes music library

Tuna

Tunalysis is a small(ish) Ruby script that will read your iTunes library, crunch numbers, and gives you a few interesting facts about it, such as:

  • Total number of songs
  • Total number of playlists
  • Average song length
  • Average bitrate
  • Average play count
  • Average skip count
  • Total time spent listening to music

Some of these statistics are already available in iTunes, but Tunalysis ultimate goal is to expand iTunes (limited) stats and to give you hindsight on your musical habits and tastes.

Tech

Tunalysis is written in Ruby and uses Bleything’s plist to parse iTunes’ XML library.

At the time being, Tunalysis only works on OS X. I’m not planning to do a Windows port, but will gladly accept a patch if you do. :)

Tunalysis is licensed under the GPLv3.

Features to come

  • You don’t like that: suggest music to delete based on the skip count, the play count, and the last played date
  • Preferred artists (by number of songs)

I’m open to suggestions. If you’re interested in a particular piece of data, leave a comment or send me an email and I’ll add it.

Get Tunalysis on GitHub!