Startup Items: launch services at boot

This post is a follow-up on the setup of your own Apache web server (although the technique can be used to start about anything of course).

Unlike classical Linuces that stock programs to launch at boot in a /etc/init.d folder for example; OS X uses a mechanism called Startup Items. These items can be found in /Library/StartupItems/, ~/Library/StartupItems and /System/Library/StartupItems.

One particular strength of the Startup Items is that you can specify in which order to launch them.

Let’s say I’ll make a startup item called MyApache. I’ll start by create the folder:

mbp:~ florent$ sudo mkdir /Library/StartupItems/MyApache

This folder will contain at least two files: an executable script called MyApache, and a file called StartupParameters.plist.

The script will be called at startup and shutdown, and will look like this:

#!/bin/sh

## Apache Web Server ; custom install ##

. /etc/rc.common
StartService (){
    ConsoleMessage "Starting Apache"
    /usr/local/apache2/bin/launchctl start
}

StopService (){
    ConsoleMessage "Stopping Apache"
    /usr/local/apache2/bin/launchctl stop
}

RestartService (){
    ConsoleMessage "Restarting Apache"
    /usr/local/apache2/bin/launchctl restart
}

RunService "$1"

The StartupParameters.plist file will contain data about the information to launch. It’s an XML file that will look like:

<?xml version="1.0" encoding="UTF-8"?>
<!DOCTYPE plist PUBLIC "-//Apple Computer//DTD PLIST 1.0//EN" "http://www.apple.com/DTDs/PropertyList-1.0.dtd">
<plist version="1.0">
<dict>
    <key>Description</key>
    <string>My own Apache webserver</string>
    <key>Messages</key>
    <dict>
        <key>start</key>
        <string>Starting my Apache</string>
        <key>stop</key>
        <string>Stopping my Apache</string>
    </dict>
    <key>Preference</key>
    <string>Late</string>
    <key>Provides</key>
    <array>
        <string>MyApache</string>
    </array>
    <key>Requires</key>
    <array>
        <string>Network</string>
    </array>
    <key>Uses</key>
    <array>
        <string>Disks</string>
    </array>
</dict>
</plist>

We can see that Apache Requires the networks to be up, and will use Disks.

Let’s imagine I want to launch my Apache after my Jabber server for some reason. I’ll just create a StartupItem called “Jabber”, the same way as we just did, then add the following line to MyApache’s StartupParameters.plist “Requires” section:

                <string>Jabber</string>

Now at startup, OS X will launch Jabber and wait until it’s up and running before launching Apache.
Compiling and installing Apache on Mac OS X

Update: instead of the completely manual method, I’d now recommend using the most excellent Homebrew. The “missing package manager for OS X” will automatically download and compile the latest version and verify the checksums, amongst other niceties. It’s awesome, and only gaining more momentum.

Original post:

As you may already know, Apple bundles a version of Apache into Mac OS X. This httpd can be started in System Preferences > Sharing > Web Sharing. Its configuration files are located in /etc/apache2/.

Unfortunately, given Apple’s habit of not releasing patches too often, OS X’s Apache might lag a few versions behind. For example, bundled version on Snow Leopard at the time I’m writing this is 2.2.13; while the latest version is 2.2.15. It contains some (small to medium-ish depending on your setup) security fixes.

Hence, here I’m going to speak about building and installing your own Apache on OS X.

First, let’s get our hands on the sources: download the latest version from the Apache Foundation. Save it somewhere and check the integrity of the archive using MD5:

mbp:~ florent$ md5 ~/Downloads/httpd-2.2.15.tar.bz2
MD5 (/Users/florent/Downloads/httpd-2.2.15.tar.bz2) = 016cec97337eccead2aad6a7c27f2e14

Or SHA1:

mbp:~ florent$ shasum ~/Downloads/httpd-2.2.15.tar.bz2
5f0e973839ed2e38a4d03adba109ef5ce3381bc2  /Users/florent/Downloads/httpd-2.2.15.tar.bz2

These computed hashes should match the values given on the Apache website1.

Now time to configure our httpd.

Untar the archive, `cd` into the installation folder, and:

mbp:httpd-2.2.15 florent $ ./configure --prefix=/my/path

Here, the prefix we choose is the folder where apache will be installed. By default, it is set to /usr/local/apache2.

Now we just have to build and install Apache:

mbp:httpd-2.2.15 florent$ make && sudo make install

All set!

You can use apachectl to start the newly installed server:

mbp:~ florent$ sudo /usr/local/apache2/bin/apachectl start

1. If they don’t, you have quite a big problem: try downloading the archive again. If still no match, you may be the victim of a Man in the Middle attack; but a sloppy one (if you’re being tricked into downloading a fake archive, the attacker should be able to send you fake hashes too). Or more probably an infected mirror. Or even more probably you’re not reading the right hashes on the Apache website. : )

SSH without a password: using public keys

If you’re often logging remotely into UNIX-like machines using SSH, you may grow tired of having to type and retype your password each and every time. And even more so if you’re running rsync, or any other service, over SSH.

To make our life easier, we can establish a secured SSH connection between computers using public/private keys generated with OpenSSH.

In this example, I’ll say I want to connect to my server from my laptop.

In a tiny tiny nutshell

We’re going to create a set of public/private keys on our laptop, copy the public key on the server and add it to the authorized_keys.

With some commands and explanations

First of all, we’ll generate a RSA private/public key pair using OpenSSL:

laptop:~$ ssh-keygen -t rsa -b 2048

ssh-keygen will then ask for a place to save the keys (the default ~/.ssh/id_rsa is good) and a passphrase. You may enter a blank passphrase.

So what are these arguments exactly? -t specifies the algorithm to use, and -b is the key length in bits.

To quote the man page:

-b bits

Specifies the number of bits in the key to create.  For RSA keys, the minimum size is 768 bits and the default is 2048 bits. Generally, 2048 bits is considered sufficient.  DSA keys must be exactly 1024 bits as specified by FIPS 186-2.

 
For information, on my machine, generating a 1024 bits key is instantaneous, a 2048 bits key takes a second or two, a 4096 bits key is around 10 seconds, and a 8192 bits key took nearly 8mn.

Okay, so now we have two keys sitting in our ~/.ssh folder:

- id_rsa – our private key.
id_rsa.pub – you guessed it from the extension: our public key.

Second step is to transmit our public key to the server, for example using a USB key, or scp:

laptop:~$ scp ~/.ssh/id_rsa.pub mylogin@server:./

Finally, we add this public key to the list of keys the server is going to trust:

server:~$ cat id_rsa.pub >> .ssh/authorized_keys

Voilà! You can now log into your server with a simple `ssh server` without being asked for a password – only the passphrase if you entered one. And on OS X at least, you can set Keychain Access to remember the passphrase.

You may want to delete the id_rsa.pub from your home folder on the server afterwards.

A word of advice if you entered a blank passphrase: if someone gets control of your laptop, that person now gets control of your account on the server too. Keep that in mind: public-key authentication is a good thing, but can also be a security hazard if badly used.

At least once you know that a key have been compromised, you can delete it from the authorized_keys file on the server.

Screenshots and OS X: capturing a single window

One pretty awesomely simple thing under Mac OS is making great screenshots.

You might already be familiar with Mac OS X’s classical shortcuts for screenshots, Shift+Cmd+3 (full screen) and Shift+Cmd+4 (selection). But did you know you can shoot a single window without the hassle of selecting it from edge to edge, or worse, cropping from a full screenshot?

Press Shift+Cmd+4, then press the space bar.

A little camera appears, and allows you to capture the highlighted window of your choice.

The resulting image can be found at the same place as usual screenshots – by default, on the desktop, as a PNG file. With transparency and drop shadows, nothing less!

NB: apart from “real windows”, this camera can also capture the Dock, the menu bar, the desktop wallpaper, and even widgets.

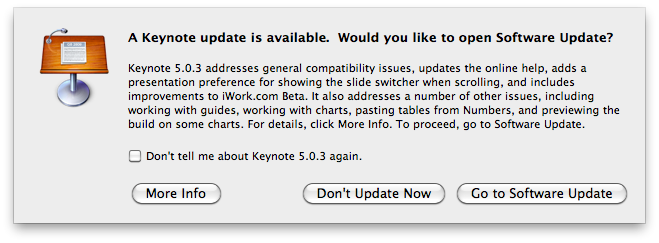
A Keynote update is available. Would you like to open Software Update?

This nice explicative window popped up last time I opened Keynote (iWork ’09) :

A Keynote update is available. Would you like to open Software Update ?

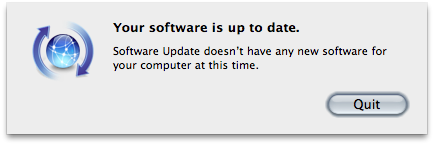
Why yes, I would love to, but when I open Software Update…

Your software is up to date.

No updates are available.

What’s happening there ? Well, it seems that OS X’s Software Update only checks for /Applications/ to see if Apple applications (e.g. iWork, Aperture) are present on the system, and need upgrading. Which means that if you have some of these Apple applications located at any other place on your hard drive -in my case, being a subfolder-creating control freak, /Applications/Work/iWork ’09/Keynote.app -, they won’t update properly.

Easy fix? Put the iWork ’09 directory back into /Applications/, let Software Update do its job, and then reorganize your directories as you like. You will have to do it for each new update though.